
In the process of learning and growing as a React Native developer, at some point in your career you’ll get to the point when you get a task that requires more specific/exotic functionality than React Native abstractions can offer at that point of time. E.g. you need to use some library written in another language (C++, Obj-C, Swift, Java, Kotlin…) and there is no existing RN wrapper for this library. Or you need to create some fancy UI component which is hard to do on your own, but you know that there are plenty of UI libraries for that platform that can do exactly what you need in a couple of code lines. There could be even more examples of such scenarios, but the point is:
“Sometimes you might come to a task that slightly differs from the regular workflow, and React Native doesn’t provide required tools out of the box, and third party modules for solving this kind of problems do not exist, or you doubt their reliability”
That’s what I faced on one of my recent projects. Hopefully, for such cases, React Native provides a pretty comfortable way to integrate your own native modules to the project.
Table of Contents
Problem
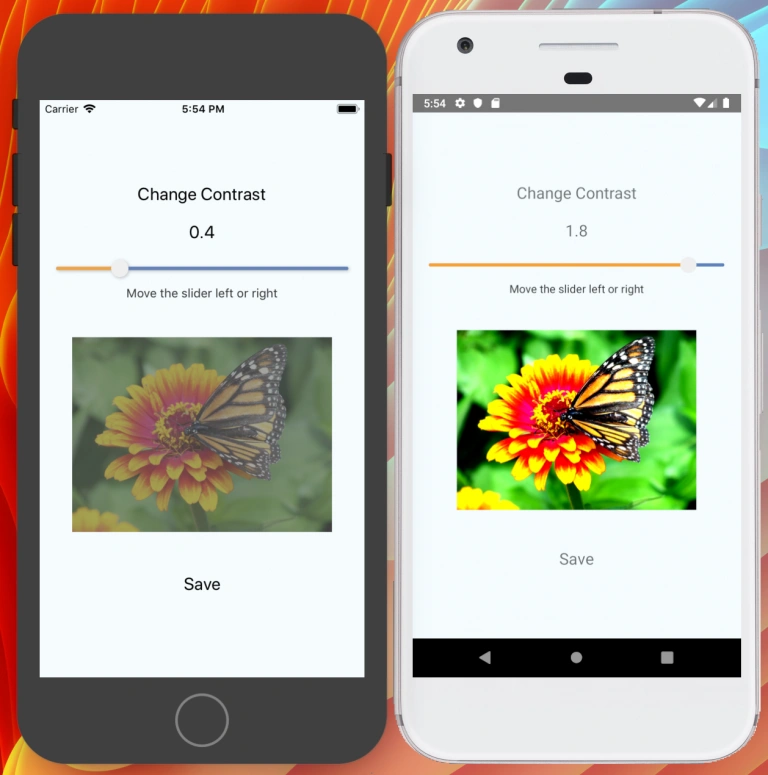
Firstly, I needed to perform contrast changing for an image by dragging the slider. Secondly, to achieve better performance by avoiding serialization and sending data over the RN Bridge, I needed to display the processed image right on the ‘native’ side with UIImageView/AppCompatImageView (for iOS and Android respectively). That’s exactly what we’re going to build by the end of this article.
For the task of changing image contrast, I decided to use OpenCV library, which is written in C++. The process of integrating OpenCV in native code for Java and Objective-C is described in details in this beautiful article by Piotr Suwala.
Now with OpenCV library set up, we’re ready to create our native UI module that will use it. I want to create an Image UI component which fetches picture from the received url, processes and displays it with the defined contrast. This view also should receive resizeMode to remain visually consistent between iOS and Android.

Link to the demo repo: https://github.com/ProductCrafters/rn-contrast-changer
General Guideline
General guidelines for creating custom native UI components are:
- Create your custom View by subclassing native ImageView class of your platform (AppCompatImageView/UIImageView for Android and iOS respectively). Add private
fetchedImageDataproperty, also addurl,contrast,resizeModepublic props with corresponding setters, so that on changing url value the fetchedImageData will be re-fetched, and on contrast changing the fetchedImageData will be re-processed and re-drawn. - Create the ViewManager for your custom View by subclassing ReactNative ViewManager wrapper class (SimpleViewManager/RCTViewManager for Android and iOS respectively). In your custom ViewManager override createView method (createViewInstance/RCTViewManager for Android and iOS respectively), and also declare ReactViewProp methods that will expose your custom View’s properties and will call it’s correspondent property setters.
- Create the package with your custom ViewManager subclassed from ReactPackage. Add your package to the global ReactNative native modules registry.
For more details read farther through the post. So, let’s start with Android.
Creating custom ImageView
Our first step is to create our own ImageView. Before moving forward, just take a slight glance at the final file of custom ImageView class to get a general idea of what’s going on.
Viewing code in the file above, you might come to a question, why did we subclass AppCompatImageView and not ImageView ? Firstly, because AppCompatImageView is very like ImageView, but it also supports compatible features on older versions of the Android platform. Secondly, just because Android Studio gives you that annoying yellow warning when you try to use ImageView instead of AppCompatImageView.
Here besides the default constructor, you can notice three self-explanatory private variables.
  private Bitmap fetchedImageData = null;
   private String fetchUrl = null;
   private double contrast = 1;

   public RNContrastChangingImageView(Context context) {
       super(context);
   }
There are also three setter methods for each of public properties (url, contrast, resizeMode)
 public void setFetchUrl(String imgUrl) {
       if (imgUrl != this.fetchUrl) {
           this.fetchUrl = imgUrl;
           downloadImage(imgUrl);
       }
   }

   public void setContrast(double contrastVal) {
       this.contrast = contrastVal;
       if (this.fetchedImageData != null) {
           this.updateImageContrast();
       }
   }

   public void setResizeMode(String mode) {
       switch (mode) {
           case "cover":
               this.setScaleType(ScaleType.CENTER_CROP);
               break;
           case "stretch":
               this.setScaleType(ScaleType.FIT_XY);
               break;
           case "contain":
           default:
               this.setScaleType(ScaleType.FIT_CENTER);
               break;
       }
   }
Here in setters we re-fetch the image in case the url prop has changed by calling our downloadImage() method, and also do the re-processing of image in case the contrast prop changing by calling our updateImageContrast().
Interesting part comes when we need to download the image from the url prop.
private void downloadImage(String imgUrl) {
       DownloadImage task = new DownloadImage();
       Bitmap result = null;

       try {
           result = task.execute(imgUrl).get();
       }
       catch (InterruptedException | ExecutionException e) {
           e.printStackTrace();
       }

       this.fetchedImageData = result;
       this.setImageBitmap(result);
   }

   class DownloadImage extends AsyncTask<String, Void, Bitmap> {
       @Override
       protected Bitmap doInBackground(String... imgUrls) {
           URL url;
           HttpURLConnection httpURLConnection;

           try {
               url = new URL(imgUrls[0]);
               httpURLConnection = (HttpURLConnection) url.openConnection();
               httpURLConnection.connect();
               InputStream in =httpURLConnection.getInputStream();
               Bitmap myBitmap = BitmapFactory.decodeStream(in);
               return myBitmap;
           }
           catch (MalformedURLException e) {
               e.printStackTrace();
               return null;
           } catch (IOException e) {
               e.printStackTrace();
               return null;
           }
       }
   }
To avoid blocking of the main thread while fetching the image, we create our little DownloadImage class derived from AsyncTask, to download image in the background. In this class we override required method doInBackground(). It downloads the image form received URL and return it’s Bitmap data.
We use DownloadImage class in our downloadImage() method by creating the task instance and execute it with received imgUrl prop. The result is stored to our private fetchedImageData field.
In updateImageContrast() method we just do some image data transformations with OpenCV library which I googled for this task 🙂
private void updateImageContrast() {
   try {
       Mat matImage = new Mat();
       Utils.bitmapToMat(this.fetchedImageData, matImage);

       Scalar imgScalVec = Core.sumElems(matImage);
       double[] imgAvgVec = imgScalVec.val;

       for (int i = 0; i < imgAvgVec.length; i++) {
           imgAvgVec[i] = imgAvgVec[i] / (matImage.cols() * matImage.rows());
       }
       double imgAvg = (imgAvgVec[0] + imgAvgVec[1] + imgAvgVec[2]) / 3;
       int brightness = -(int) ((this.contrast - 1) * imgAvg);
       matImage.convertTo(matImage, matImage.type(), this.contrast, brightness);

       Bitmap resultImage = Bitmap.createBitmap(
           this.fetchedImageData.getWidth(),
           this.fetchedImageData.getHeight(),
           this.fetchedImageData.getConfig()
       );
       Utils.matToBitmap(matImage, resultImage);

       this.setImageBitmap(resultImage);
   } catch (Exception e) {
       e.printStackTrace();
   }
}
That’s it for our custom ImageView. Let’s move on to the manager class for our view.
Creating custom ViewManager
The next step is to create the manager class for our custom ImageView. The class is pretty small, so here it is:
public class RNContrastChangingImageManager extends SimpleViewManager<RNContrastChangingImageView>{
   @Override
   public String getName() {
       return "RNContrastChangingImage";
   }

   @Override
   protected RNContrastChangingImageView createViewInstance(ThemedReactContext reactContext) {
       return new RNContrastChangingImageView(reactContext);
   }

   @ReactProp(name = "url")
   public void setFetchUrl(RNContrastChangingImageView view, String imgUrl) {
       view.setFetchUrl(imgUrl);
   }

   @ReactProp(name = "contrast", defaultFloat = 1f)
   public void setContrastValue(RNContrastChangingImageView view, float contrast) {
       view.setContrast(contrast);
   }

   @ReactProp(name = "resizeMode")
   public void setResizeMode(RNContrastChangingImageView view, String mode) {
       view.setResizeMode(mode);
   }
}
In our custom ViewManager we extend the generic SimpleViewManager React Native class with the type parameter of our custom ImageView, which is RNContrastChangingImageView in my case. Here we must override the getName() method, which returns the name string of our module, and that’s how our native module will be called in JS.
The next mandatory method that we need to override is createViewInstance(). This is the most important method in this class, as it instantiates out custom ImageView that we created above. It receives the ThemedReactContext prop and passes it to the constructor of our custom ImageView. This means that our view block can be responsive to the passed styles just like any other View in our ReactNative JS code.
Other methods are the view properties that we expose to JS. They are marked with @ReactProp annotation with specified name value (this value will be used as prop name exposed to JS), and they receive two params, the first one is the reference to the instance of our custom ImageView, and the second is param is the value of the prop. The bodies of these methods do only one thing, call proper setters on our view instance and pass received property value to it.
That’s all what we’ve got on our custom ImageViewManager, let’s move on to the last part.
Add your custom UI component to the global RN native modules registry
Firstly, create the package module with your custom ImageViewManager
public class RNContrastChangingImagePackage implements ReactPackage  {
   @Override
   public List<NativeModule> createNativeModules(ReactApplicationContext reactContext) {
       return Collections.emptyList();
   }

   @Override
   public List<ViewManager> createViewManagers(ReactApplicationContext reactContext) {
       return Collections.<ViewManager>singletonList(
           new RNContrastChangingImageManager()
       );
   }
}
Implement the ReactPackage from ReactNative. Add your new CustomImageViewManager() to the returning list in createViewManagers().
Secondly, add your new CustomImageViewPackage() to the returning list in getPackages() method in MainApplication.java of your Android project.
public class MainApplication extends Application implements ReactApplication {
 private final ReactNativeHost mReactNativeHost = new ReactNativeHost(this) {
   @Override
   public boolean getUseDeveloperSupport() {
     return BuildConfig.DEBUG;
   }

   @Override
   protected List<ReactPackage> getPackages() {
     return Arrays.<ReactPackage>asList(
         new MainReactPackage(),
             new RNContrastChangingImagePackage()
     );
   }

   {{ … }}
And that’s it, you’re ready to call your module from your JS code.
Using your custom native UI component in JS
For the sake of comfortability, we will import our custom ImageView from the global React native modules registry and export it as a React component. The last, but not least is documentation for our component. We will add PropTypes and DefaultProps.
import React from 'react'
import PropTypes from 'prop-types'
import { requireNativeComponent } from 'react-native'

class ContrastChangingImage extends React.Component {
  render() {
    return <RNContrastChangingImage {...this.props} />
  }
}

ContrastChangingImage.propTypes = {
  url: PropTypes.string.isRequired,
  contrast: PropTypes.number.isRequired,
  /**
   * Determines how to resize the image when the frame doesn't match the raw image dimensions.
   * enum('contain', 'cover', 'stretch') with 'contain' value by default.
   */
  resizeMode: PropTypes.oneOf(['contain', 'cover', 'stretch']),
}

ContrastChangingImage.defaultProps = {
  resizeMode: 'contain',
}

var RNContrastChangingImage = requireNativeComponent('RNContrastChangingImage', ContrastChangingImage)

export default ContrastChangingImage
The example of usage of our custom ImageView component would look like this.
   {{ … }}
import Slider from 'react-native-slider'

export default class App extends Component {
  state = {
    imgUrl: 'https://www.publicdomainpictures.net/pictures/20000/nahled/monarch-butterfly-on-flower.jpg',
    contrastValue: 1,
  }

  handleSave = () => {
    Alert.alert('Current Contrast Value', `${this.state.contrastValue}`)
  }

  onValueChange = value => this.setState({ contrastValue: +value.toFixed(1) })

  render() {
    const { contrastValue, imgUrl } = this.state
    return (
      <View style={styles.container}>
        <Text style={styles.title}>Change Contrast</Text>
        <Text style={styles.title}>{contrastValue}</Text>
        <Slider
          style={styles.slider}
          value={contrastValue}
          onValueChange={this.onValueChange}
          step={0.1}
          minimumValue={0}
          maximumValue={2}
          thumbTintColor={'#efefef'}
          minimumTrackTintColor={'#F8A136'}
          maximumTrackTintColor={'#5E82BC'}
        />
        <Text style={styles.instructions}>Move the slider left or right</Text>
        <ContrastChangingImage style={styles.image} contrast={contrastValue} url={imgUrl} />
        <TouchableOpacity onPress={this.handleSave}>
          <Text style={styles.title}>Save</Text>
        </TouchableOpacity>
      </View>
    )
  }
}
As you can see, it’s not that hard to write your own native modules for React Native. So the next time you face the situation, when there’s no existing RN module solving your task, you will be able to start searching for some native code solutions for your platform, write a little wrapper for them, and use it in your JS project.
References
- https://brainhub.eu/blog/opencv-react-native-image-processing
- https://docs.opencv.org/3.4.3/d3/dc1/tutorial_basic_linear_transform.html
- https://reactnative.dev/docs/intro-react-native-components
- https://reactnative.dev/docs/legacy/native-components-ios
- https://hackernoon.com/react-native-bridge-for-ios-and-android-43feb9712fcb
- https://hackernoon.com/react-native-bridge-for-android-and-ios-ui-component-782cb4c0217d
Read more:
– Adding SVG Icons to Your React Native App
– Creating Custom React Native UI Components Android